
How to Increase Internet Speed in Windows 10
Increase
Internet Speed – Learn how to increase internet speed in Windows 10
computer? Top 5 methods to increase internet speed in Windows 10 PC or
boost internet speed free.
Increase
Internet Speed – Learn how to increase internet speed in Windows 10
computer? Top 5 methods to increase internet speed in Windows 10 PC or
boost internet speed free.
I think you have already updated the OS to Windows 10.
Microsoft has managed to come up with an excellent Windows operating
system after the Windows 8 struggling. The latest version of Windows has
got massive popularity by allowing Windows 7, 8 and 8.1 users a free
upgrade.
Windows 10 has many
useful and unique features. I have successfully upgraded my system and
found it worth. If you are still hesitant to do the same, do it now. It
will not affect your system badly. Instead, the booting time, shut down time, and the performance will be improved by leaps.
You might have faced some issues as Windows 10 operating system
is a new OS and is not free from bugs. Have you ever noticed an
internet speed decline? If so, you can sit back now. Today, I am here to
help you increase internet speed in Windows 10 computer.
Top 5 methods to increase internet speed in Windows 10
You can boost internet speed in Windows 10
by making small changes in the system settings. You can also make use
of some tools. You can find five methods to increase internet speed
here.
Are you ready to take action for increasing internet speed? If yes, here we go:
Method 1: Enable Limit Reservable Bandwidth
Microsoft has integrated certain hidden
features on Windows 10. Even though those are useful, it decreases the
speed of internet connection. This is one such.
By default, Windows 10 uses 80% of your
bandwidth, leaving the 20% for the internal use. That means you can’t
get the complete speed of the connection. The remaining 20% is used for
Windows updates.
Here I am going to show how you can boost internet speed by enabling limit reservable bandwidth.
Step (1): Press Win + R
keys simultaneously. This will give you Run dialogue box. It’s a
one-time, interactive command prompt that can be used to execute
commands, one at a time.
Step (2): Enter ‘gpedit.msc‘ into the field given (without quotes). Then press Enter or click OK.

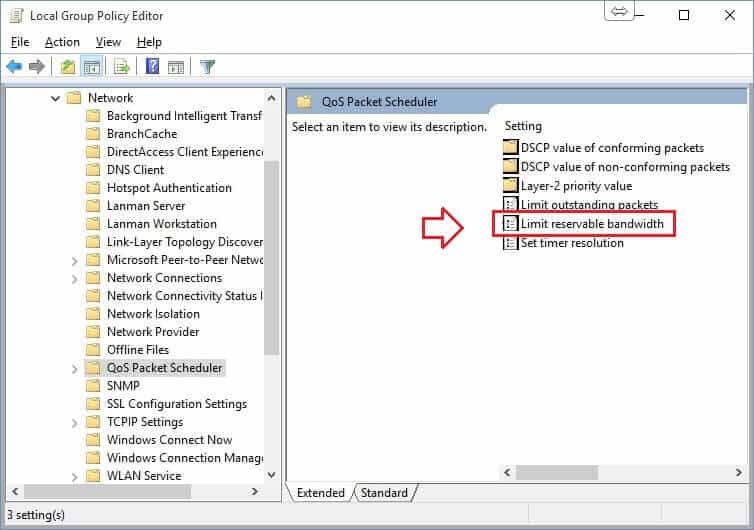
Step (3): Now, you can see Local Group Policy Editor. Don’t underestimate the power of this window. It can make or break your system by some simple tweaks.
Now, go to Computer Configuration → Administrative Templates → Network → QoS Packet Scheduler.
Step (4): Look for Limit reservable bandwidth. You can see it at the bottom. Open it by double-clicking on it or simply right click and choose Edit.
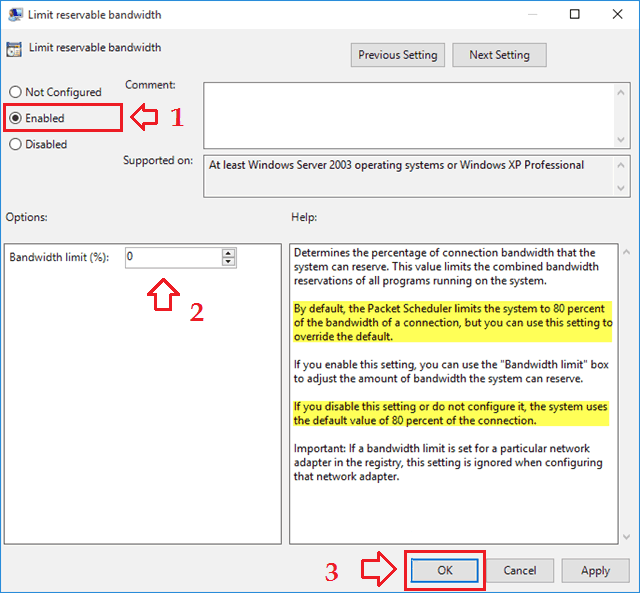
Step (5): Clearly, you
will be able to see three options, Not configured, Enabled, Disabled. By
default, the first option is turned on. You need to select the second
one “Enabled“. Modify the value from 80 to 0. Then, click OK. That’s all.
You now know how to boost internet speed in Windows, right?
Now we can move on to the second method.
Method 2: Turn Off Update Delivery Optimization
If you are searching “how to increase internet speed in Windows 10” on the web then this is another best method to boost internet speed on PC without any software. Windows update delivery optimization
is a default option in Windows 10 that badly affects your internet
speed. Obviously, it’s a useful one. But turning it off will not affect
your system in anyways.
All of us know the internet speed decreases when we share our Wifi connection with others. It’s because a single resource is shared by many. It’s similar here.
To increase internet speed by turning off update delivery optimization feature, follow the procedure given below.
You might have already known that there
is a Settings option in Windows 10 along with the Control panel. We need
to make use of this Window to turn off update delivery optimization and
thereby increase the internet speed.
At first press the Win key button or
else click on the start button. (Yeah, it’s there. Windows 10 comes with
a start button). There, you can see Settings menu just above the Power options. Now, click on it.
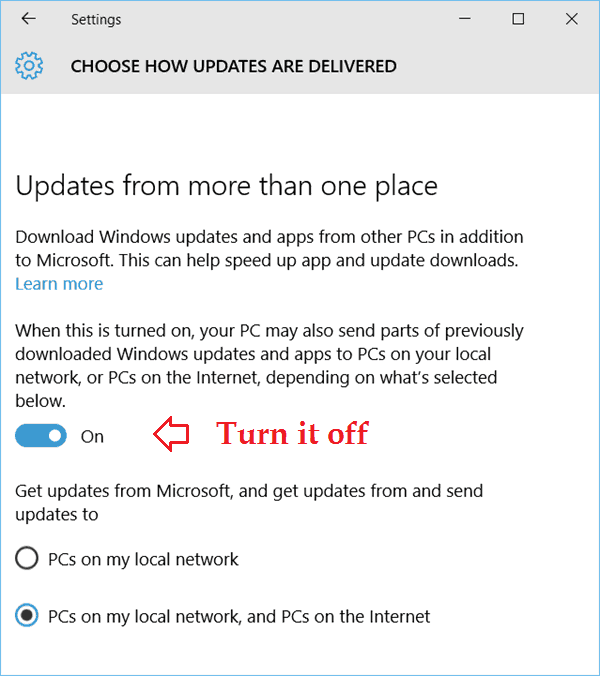
You will be lead to a Settings window. Scroll down to the bottom to see the last option, Update & security completely. Choose it. From the upcoming window, click the Advanced options.
Now you will get another page. Click on Choose how updates are delivered link. Turn this service off in the upcoming window. That’s it.
This is a useful feature. When any Windows 10 user faces an issue in downloading Windows updates,
your system will transfer your already downloaded updates via P2P
sharing like uTorrent or some other channels if this option is turned
on.
I recommend turning on this option if
you have a high-speed internet connection. It will help many regarding
the Windows updates.
Method 3: Use Internet Download Manager to Increase Download Speed
It is very irritating to wait hours for a
small file to get downloaded completely. I have gone through this
situation. But one tool came to my rescue at that time. It helped me a
lot in downloading files even when my browsing speed was mediocre. It’s
none other than Internet Download Manager aka IDM.
Unfortunately, it’s not free of charges.
You need to spend some bucks to get the full version. But they provide a
14 days trial period for getting to know session with the product. You
can check whether it’s worthy or not by making use of this feature.
If you want to get full-featured IDM version for free, you can try the methods which is explained in the guide of “Internet Download Manager Free Download with Serial Number”
to enjoy free download internet download manager with serial key. If
you found it worth, you can have the full version without spending a
single penny.
IDM is the best download manager you can
ever download. I have tested DAP, Orbit, and many other download
managers. But nothing comes up to the level of IDM and competes with it.

IDM has many useful features. The main
benefit is the increase in download speed. It drains the most out of
your connection to provide you a better downloading speed. IDM downloads
any file by eight parts. This is how they accelerate the download
process. At last, it merges the split files to give you the resultant
file.
You can Pause and Resume a download in
this manager. A Chrome extension and Firefox add- on is also available
to download embedded media. Whenever you visit a website with embedded
medias, a small popup occurs and asks you whether or not to download the
files. IDM works with YouTube like a charm. You can even download
videos of different quality.
In case, if you are not comfortable with
Internet Download Manager and looking for similar sites like IDM then
you can try these best free Internet download manager alternatives.
All these popular alternatives for internet download manager offer
almost similar fast download speed and other downloading features.
You must give a try to this method. We are damn sure, using Internet Download Manager will certainly help you in increasing download speed on Windows 10 computer.
Method 4: Change DNS Server to Increase Internet Speed
DNS or Domain Name
System has a vital role in determining the speed of an internet
connection. Due to the errors in DNS, you won’t get good speed even if
your connection is decent.
Every website has a unique IP address.
When we type a URL into the address field, DNS changes the URL into the
IP. Then only we can see the website. Any error in Domain Name System
results in the inability of internet connection to display websites.
The solution to this problem is nothing
but change the default DNS our Internet Service Providers give. Normally
people use open DNS and Google’s Domain Name System.
You can follow this guide “How to Change DNS Server on Windows PC”
in order to know the exact DNS address changing procedure. Or, read the
steps given below to know how to boost internet speed by changing DNS
address:
Step (1): Right-click on your network connection from the system tray and then choose Open Network and Sharing Center. This is the place we come to change settings related to the network.
Step (2): Simply, click on Change adapter settings.
You can see all your active connections there. Select one you currently
use. It will lead you to a small box with more network details.
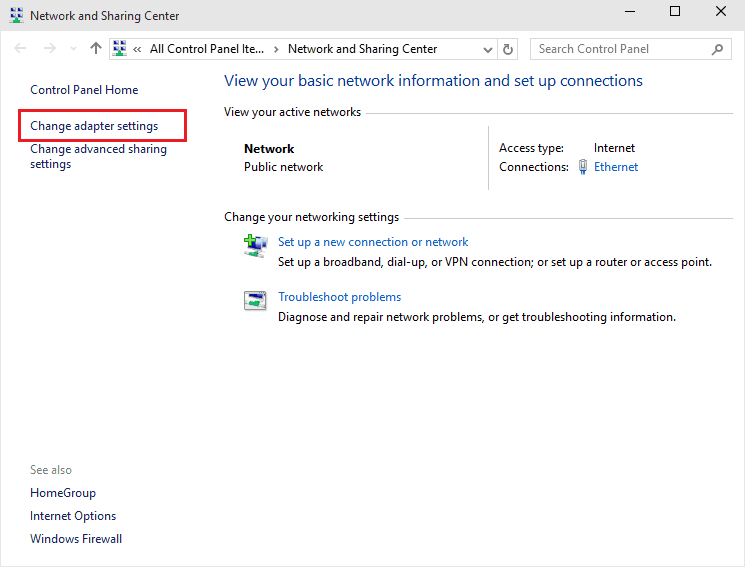
Step (3): At the left end of the bottom, you can see Properties button. Click on it.
Step (4): Now, you will get a list of checkboxes. Glance through it to find Internet Protocol Version 4 (TCP/ IPV4). After selecting it click on Properties at the right- bottom.
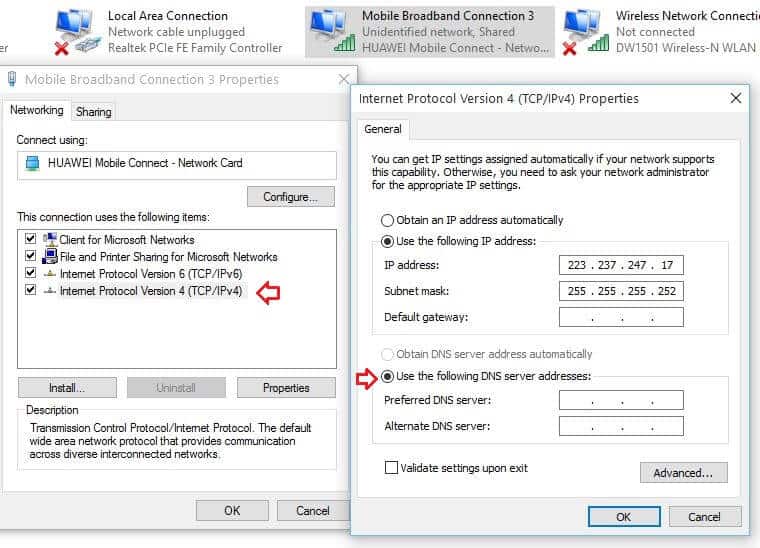
Step (5): Look at the second section of the upcoming box. You can read ‘Obtain DNS server address automatically’ and ‘Use the following DNS server addresses.’ Turn on the second radio button. And then, insert the following DNS addresses into it.
208.67.222.222 (Preferred DNS Server)
208.67.220.220 (Alternate DNS Server).
Or else you can use the DNS addresses from Google. They are
8.8.8.8 (Preferred)
8.8.4.4 (Alternate)
After doing all this, restart the modem and enjoy the speed. Changing DNS server
is really one of the most effective ways to increase internet speed, so
it will surely work for you. Here are some more helpful guides related
to DNS server which might help you if needed:
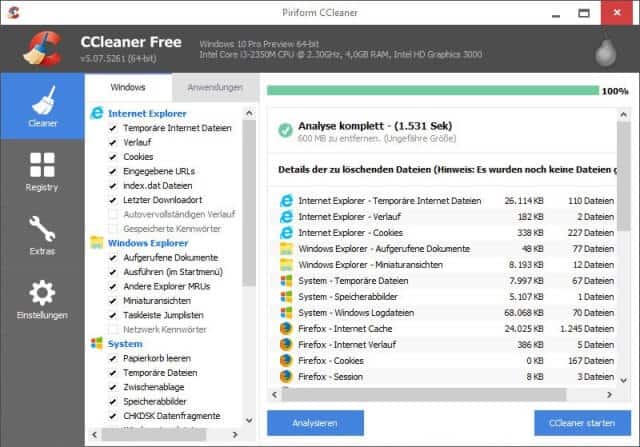
Method 5: Use CCleaner to Clear Cache, Cookies, and Browsing History
Tons of PC tuning utilities is available on the Internet. But you can’t find best one other than CCleaner, which is effective at the same time light too. CCleaner does not increase memory load. So, your system will not slow down while you run this tool.
It is a free tool that can be downloaded
from their official website. Proceed with the installation as usual.
Then, open the software. You will get two options (Analyze and Clean).
If you want to see the junk items, cache, cookies, etc., click on
analyze. Or, click Clean if you prefer a direct clean. (You can clean
after the analysis though).
You can also repair registry issues
using this tool. Cache and cookies decrease the speed of browsers up to a
great extent. So it is always recommended to clean the same at regular
intervals.
A startup management accessory also
comes with this software. In the list, check for any software like
uTorrent or Bittorrent that uses the internet connection in the
background. Then, turn off its auto start up.
In case, if you have installed CCleaner
on your Windows PC but feeling very annoyed with the frequently
appearing CCleaner alert popup which appears because of the active
monitoring system that runs continuously and silently in the background,
you can follow this guide in order to stop frequently appearing
CCleaner alert popup on your PC: How to Disable CCleaner Alert Pop-up on Windows
Have You Noticed the Difference in Your Internet Speed?
I have given you the top five methods to
increase internet speed in Windows 10. You can try out all of them to
have a significant improvement in the speed of your internet connection.
I hope now you will not search for “how to boost internet speed”
anymore. Also, remember that hardware components have a significant
impact on internet speed. So, use a good modem, splitter, and cables.
After applying all these Internet speed booster solutions, you should check how fast your internet is. You can test your internet speed with any well-known Internet speed test tools.
I hope you found this guide very useful
for you. If so, don’t forget to share this tutorial on social media
networks. I am looking forward to reading your valuable comments about
this guide on how to increase internet speed in Windows 10.
If you have taken care of all these
things on your Windows 10 PC but still your computer is performing very
slow then you need to apply some most effective methods to Speed up Windows 10 PC and make Windows 10 run faster. Here are few trending guides to make Windows 10 faster and improve its performance:
August 06, 2019
Tags :
A to Z
Subscribe by Email
Follow Updates Articles from This Blog via Email
No Comments